Like every device, the Autofill Pitcher in your Beverage Center may suddenly start acting funny and stop working for no apparent reason.
In this article, I’ll walk you through how a Samsung Autofill pitcher works, why it stops working, and some easy DIY fixes.
How Does Samsung Autofill Pitcher Work?
The Samsung Autofill Pitcher has a sensor that detects when the pitcher is in position. Once the Autofill function is pressed and the sensor detects the pitcher, the refrigerator dispenses water to fill the pitcher to an optimal level.
How to Turn On the Samsung Autofill Pitcher
The steps for switching on an Autofill pitcher vary for different models, but the most common method is to turn on the Auto Water Fill feature, then press and hold the Auto Water Fill button on the control panel until the LED light illuminates.
How to Turn On the Samsung Family Hub Autofill Pitcher
- For Family Hub models, navigate to the Family Hub’s panel and enable the Autofill feature
- Simply select Apps > Fridge Manager > Fridge Settings > Auto Water Fill
Samsung Water Pitcher – Troubleshooting
There are a few reasons why your Samsung water pitcher isn’t filling but run through the troubleshooting below to get it back up and running ASAP.
The Pitcher Hasn’t Been Placed Correctly
If the pitcher is not placed correctly in the dispenser or compartment, the autofill feature may not work as it needs to detect that the pitcher is there to start dispensing.
How to Fix
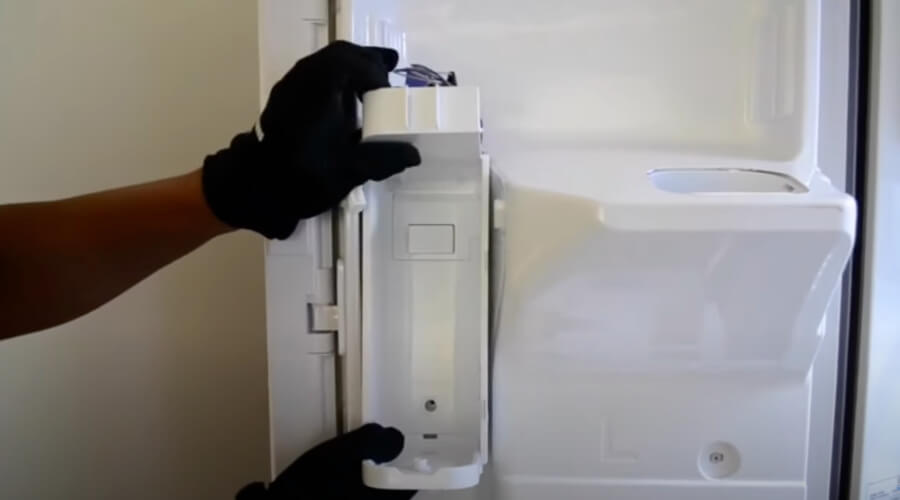
- Locate the water filter compartment in your refrigerator and open the compartment
- Remove and reinsert the Pitcher, ensuring it fits in comfortably.
- Typically, the pitcher’s spout should face forward, towards the front of the refrigerator
- If your Samsung refrigerator has a display panel, press the Autofill button to dispense water into the pitcher, or use your < o > buttons to turn AutoFill Pitcher ‘On’
The Autofill Pitcher Leaks
Leaks can occur if the pitcher and lid aren’t aligned or positioned correctly. When this happens, the Autofill Pitcher may not get refilled.
How to Fix
Drain the Autofill Compartment
- Remove the pitcher and wipe clean it, using a towel to absorb any moisture
- Then, remove the water drain cap under the Autofill compartment
- Note – Skip this step if your device doesn’t have a drain cap. Water can also be collected in the drainage area. You need to drain and dry the area for the Autofill function to work
Check the Pitcher and Lid for Damages
After draining, inspect your pitcher and lid for any cracks or other damage. If any part is faulty or questionable, you should look to replace it.
Keep All Pieces Dry and Reassemble Them
Water may leak if the pitcher and lid aren’t well aligned, so ensure both parts are correctly and tightly assembled. Take care to ensure all the pieces are dry, as the Autofill function will not work if they’re wet.
Check That the Control Button Works
Typically, the pitcher should fit in behind the spring-loaded button. Press the button a few times to make sure it’s not stuck. The Autofill feature will only work if the pitcher is in contact with the button.
Replace the Pitcher
If the leaking issue persists, the easiest fix is to replace the pitcher. Contact Samsung if your appliance is still under warranty, otherwise you’ll need to source another one from a retailer or Samsung directly.
AutoFill Icon is Disabled
Another reason the AutoFill pitcher may not work is if the AutoFill icon is disabled. When the icon blinks, it shows there is moisture in the compartment.
Repeat the steps above to remove moisture, then check the Autofill settings. Usually, AutoFill Settings will default to ‘Off’ when the water line isn’t connected. Once you’ve confirmed the water line is properly connected, switch the AutoFill to ‘On’.
How to Fix
- First, ensure your refrigerator is plugged in and water is in the reservoir, filled to the expected level
- Check the indicator to know if the device is reporting as connected If the icon indicator illuminates, then the setting is activated
- Locate and unlock the Control panel by pressing and holding down the Lock or Door Alarm button (this step varies by model) – For more details, read how to unlock a Samsung refrigerator
- Press and hold the “Auto Fill” button for a few seconds until the indicator light activates
Note: These steps may vary depending on the models.
For 2022 Bespoke 3-Door models:
- Press the O button four times to activate the Autofill Setting
- Press the < button to toggle the setting
- Press the O button again to save your setting
For Family Hub models, navigate to the fridge manager app, select Fridge Settings, and press Auto Water Fill to activate the setting.
Samsung AutoFill Water Pitcher – Replacement
Replacing the water pitcher is a reasonably simple process.
- Turn off the water dispenser and unplug it from the mains power for safety
- Locate the water pitcher within the refrigerator door
- Press the release button on the pitcher lid and remove it from the compartment
- Use a damp cloth to clean the area where the pitcher was
- Discard the old pitcher and replace it with the new one, ensuring it fits in snugly
- Switch on the water dispenser or refrigerator and test the pitcher to ensure it works perfectly
Samsung AutoFill Water Pitcher – Common Problems
Besides Samsung Autofill Pitcher not working, other common problems are associated with it.
Depending on the cause, your Autofill Pitcher may blink, leak or get moldy. Let’s consider these problems and how to resolve them.
Samsung AutoFill Icon is Blinking
If the AutoFill pitcher icon blinks, it means the AutoFill setting has been disabled – usually because of moisture in the compartment.
This might show as error code 76C, which also indicates water in the AutoFill compartment.
How to Fix
Drain the compartment, using a towel to absorb any moisture. Once it’s dry, try turning AutoFill back on.
Samsung Autofill Pitcher is Leaking
The AutoFill Pitcher can leak if it’s not securely placed in the water filter compartment. This causes a domino effect, as when the sensor detects moisture, the AutoFill feature will stop working.
How to Fix
To fix this issue, ensure the pitcher is correctly positioned in the compartment, and there’s no moisture out with the pitcher.
You can also check the pitcher thoroughly at the same time – make sure there are no visible cracks or damage. If there is, you’ll need to replace it.
Samsung Autofill Pitcher is Moldy
Your Samsung AutoFill Pitcher may develop mold due to high humidity, incorrect usage, or because of energy-saving settings on the refrigerator.
When mold clogs your pitcher, it not only prevents it from working efficiently but also presents hygiene issues.
How to Fix
While you may be tempted to run it through the dishwasher, this isn’t recommended and can cause more damage than good. To remove mold from the pitcher:
- Use a mix of white vinegar and warm water as a cleaning solution
- Remove the pitcher and fill it with the cleaning solution. Allow it to soak for at least 30 minutes – this will help loosen any mold or mildew
- After soaking, use a soft-bristled brush to scrub the pitcher’s interior, paying close attention to all the corners and crevices
- Rinse thoroughly with clean, warm water
- Dry the pitcher using a clean towel or allow it to air dry before use
- To prevent mold from building up in the future, clean spills immediately and ensure your refrigerator is set to a low humidity level